
- Today
- Yesterday
- Total
메이쁘
[Spring Boot] Google 로그인 REST API 로만 구현해보기!(코드, 스샷) 본문
안녕하세요?
Spring Boot와 Java를 이용해서
쉽고 간단하게 구글 로그인하는 API를 구현해봤습니다.
여러 블로그 및 공식 문서를 참고했습니다.
https://developers.google.com/identity/protocols/oauth2/web-server
웹 서버 애플리케이션에 OAuth 2.0 사용 | Google ID 플랫폼 | Google Developers
이 페이지는 Cloud Translation API를 통해 번역되었습니다. Switch to English 웹 서버 애플리케이션에 OAuth 2.0 사용 이 문서에서는 웹 서버 애플리케이션이 Google API 클라이언트 라이브러리 또는 Google OAuth
developers.google.com
https://developers.googleblog.com/2021/08/gsi-jsweb-deprecation.html
Discontinuing Google Sign-In JavaScript Platform Library for web
We are announcing the deprecation of the JavaScript based Google Platform Library for web apps and plan to fully retire it on March 31, 2023.
developers.googleblog.com
0. Google에 Client 등록
https://console.cloud.google.com/apis/dashboard?pli=1
Google Cloud Platform
하나의 계정으로 모든 Google 서비스를 Google Cloud Platform을 사용하려면 로그인하세요.
accounts.google.com

페이지 진입해서 구글 로그인 후,
1) 대시보드에서 "Google Cloud Platform" 옆 프로젝트 목록 클릭
2) 프로젝트 선택 팝업에서 새 프로젝트 클릭
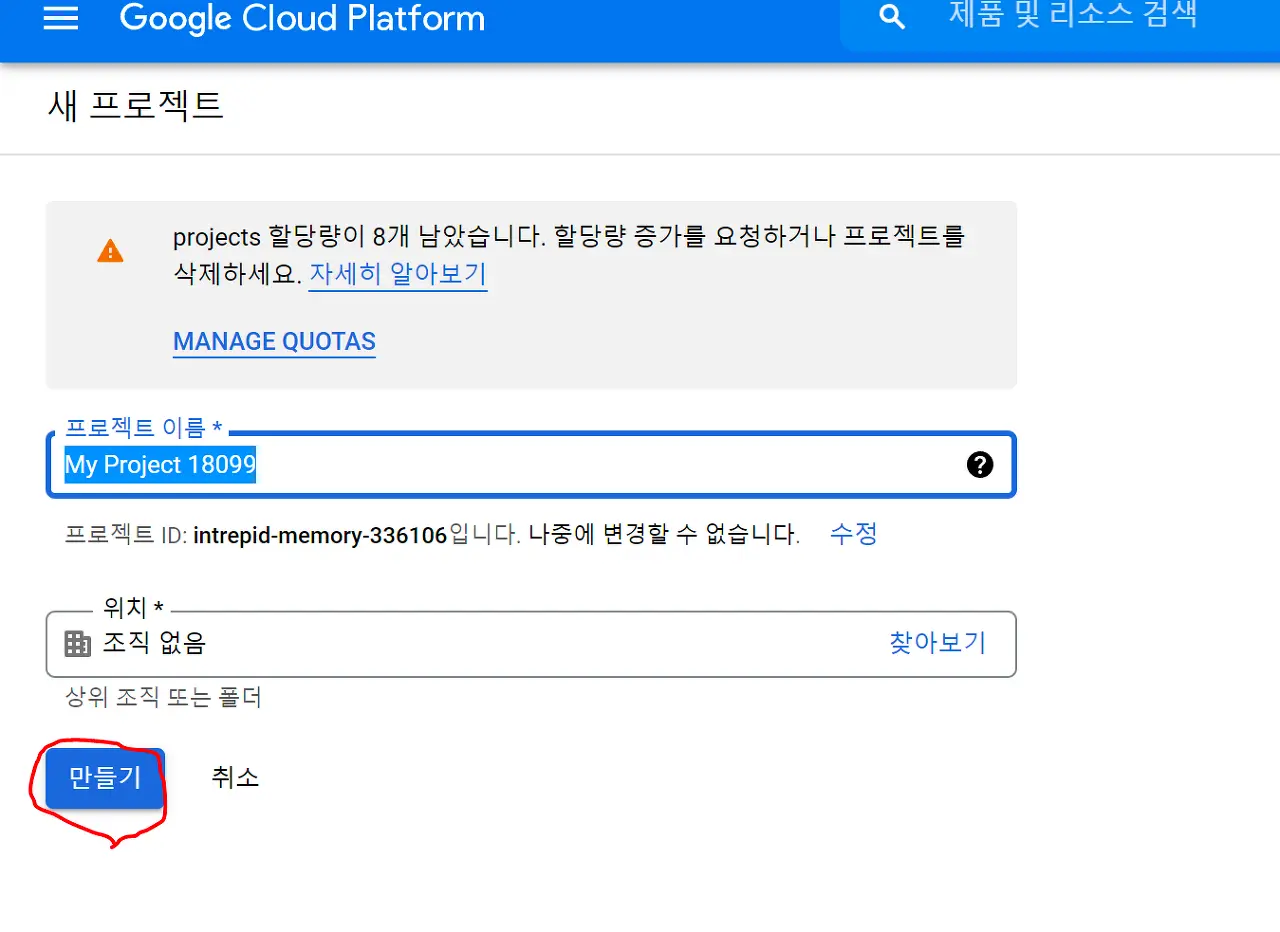
- 프로젝트 만들기
이후, 해당 프로젝트에 대한 클라이언트 인증 정보를 만들어야 합니다.
여기서는 클라이언트를 사용자라고 표시했네요.
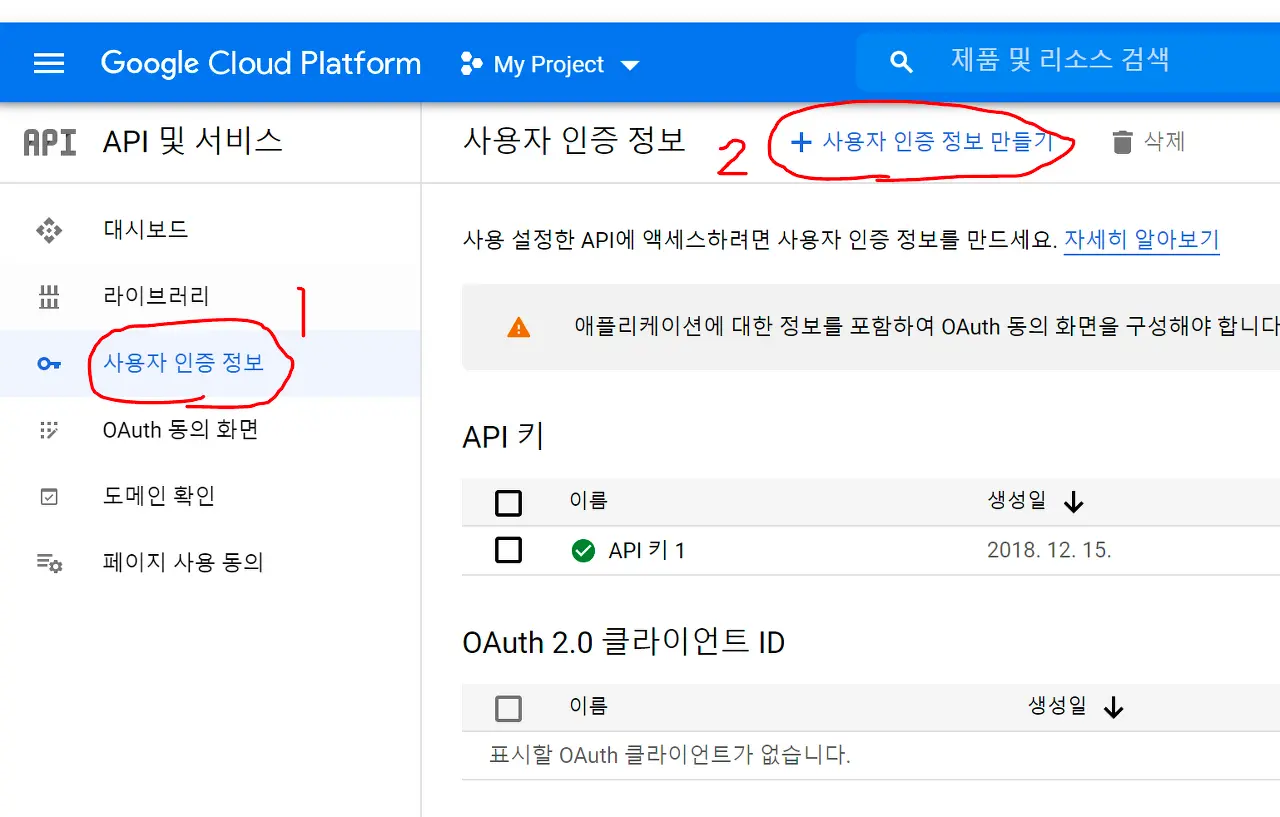
1) 사용자 인증 정보 메뉴 선택
2) 사용자 인증 정보 만들기 클릭
3) OAuth Client ID 만들기 클릭

- 동의 화면 구성 클릭

- 외부 - 만들기 클릭

필수값은 필수로 입력하고, 필요에 맞게 값 입력하고 진행
(2 - 범위 부분은 그냥 통과해도 됩니다. 여기서 scope, 즉, 로그인한 사용자 정보 공개 범위를 설정할 수 있는데, default로 이메일, 프로필, openid를 가져올 수 있습니다.)
(3 - 테스트 사용자도 별도 테스트 사용자 계정으로 테스트하지 않으면 USER 추가 없이 넘겨도 됩니다.)
이렇게 설정이 완료되서 대시보드로 돌아옵니다.
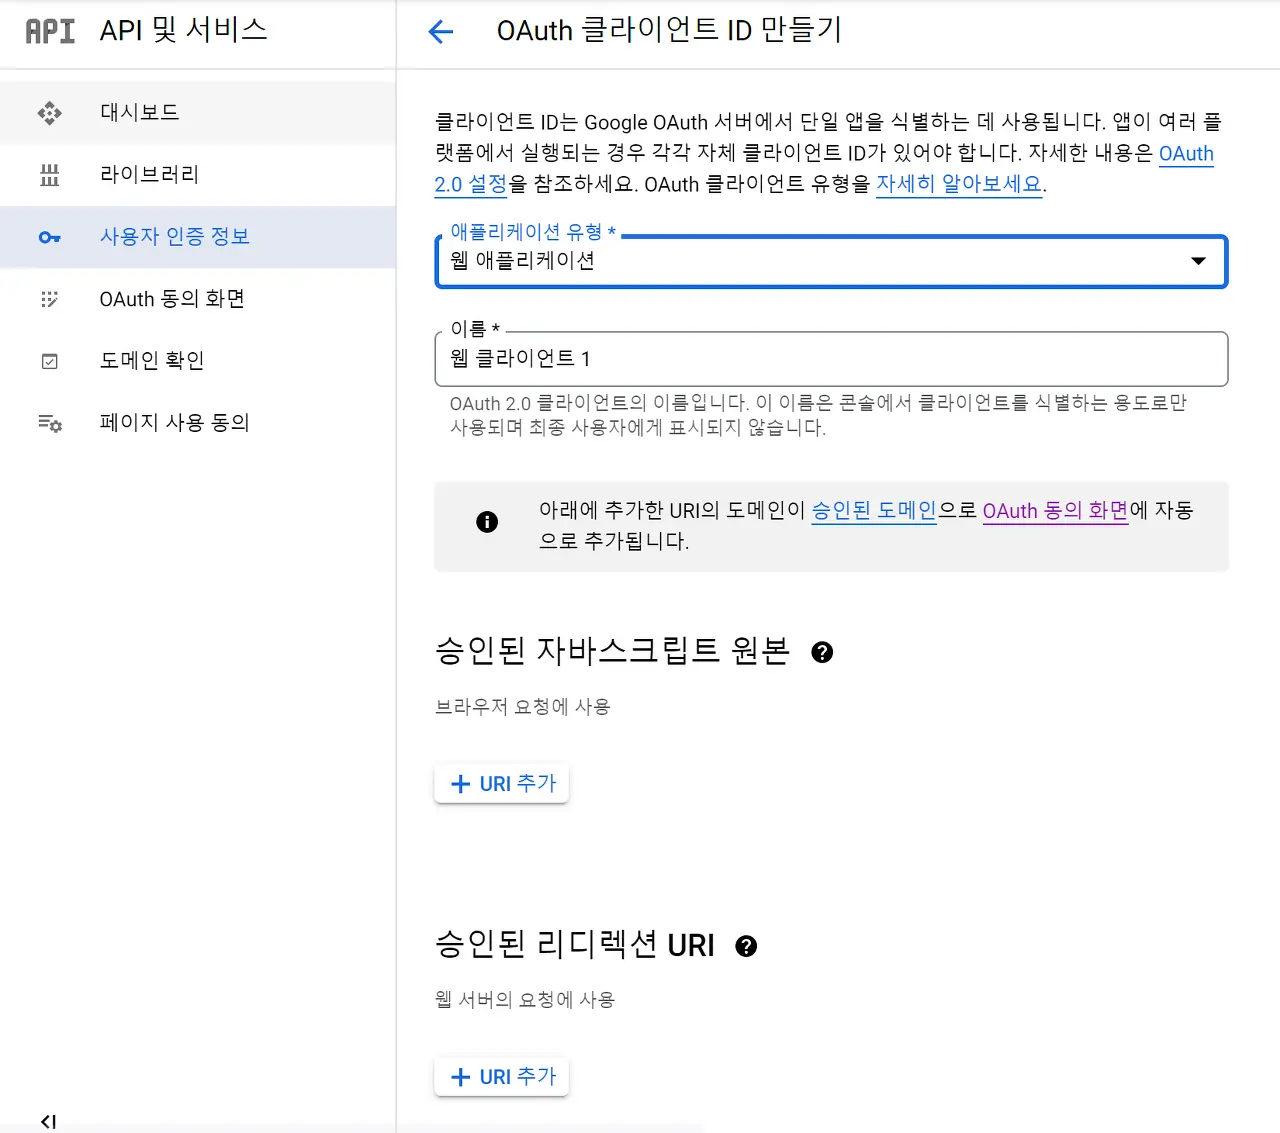
1) 다시 옆 메뉴에서 사용자 인증 정보 클릭 후
2) 사용자 인증 정보 만들기 클릭
3) OAuth 클라이언트 ID 만들기 클릭
4) 위 화면에서 애플리케이션 유형 -> 웹 애플리케이션 선택
5) 승인된 자바스크립트 원본 및 Redirection URI 입력
→ 자바스크립트 원본: http://localhost:8080 입력
(로컬서버인 경우 로컬호스트 입력 가능합니다. 또한, 별도 서버를 둔 경우에는 해당 서버의 Public IP를 입력해두면 됩니다. 대신, login 요청하는 URL의 Root 주소여야 합니다. PORT 번호도 마찬가지입니다.)
→ 승인된 리디렉션 URI : 구글 로그인 이후 사용자의 AuthCode를 전달받는 URL 입력
그렇게 해서 생성하게 되면,

대시보드에서 OAuth 클라이언트 ID의 이름을 누르게 되면 우측에 위와 같이
클라이언트 ID, 클라이언트 보안 비밀(Secret ID) 가 존재하는데요.
이를 알고 있어야 로그인 API를 사용할 수 있습니다.
이제 설정은 모두 마쳤습니다.
1. 구현 범위 및 개념 정리
저흰 OAuth2를 이용해서 Google Login API를 구현합니다.
Spring framework를 사용해서 REST API로만 구현할 계획입니다.
프론트엔드 구현 없이
특정 URL 입력하게 되면, 해당 페이지에서 (첫 로그인 시) 구글 로그인 화면으로 이동되고,
로그인 시 지정한 Redirect URL로 redirect 시킵니다.
해당 URL 또한 Controller에서 Mapping을 통해 함수 로직을 실행시키는데,
이 내부에서 일회성 Auth Token을 AccessToken으로 교환하는 과정과
이 토큰을 가지고 사용자의 정보를 가져오는 로직까지 구현합니다.

위 그림이 OAuth2.0을 활용한 Google Login API 로직 구성과 비슷하다고 생각해서 가져왔습니다.
차이점은, 프론트엔드가 존재하지 않기 때문에 SPA가 아닌 URL 요청한 웹페이지 상에서 로그인 창이 띄워진다는 점 이 있습니다.
2. 구현
구현한 코드와 로직은 따로 설명없이 코드 블럭으로 작성하겠습니다.
왜냐하면, 해당 코드 한줄한줄 설명하기에는 양이 많기도 하고,
자세한 내용은 구글 검색을 통해 알아가시는게 더 좋을 것 같아서 입니다!
전체 코드를 보고 싶으시면, 아래 깃허브 주소를 참고해주세요.
https://github.com/201402407/SPRING_BOOT_SAMPLE
Properties
// application.properties
// 확장성 및 보안을 위해 별도 properties에 값 지정

# google login
google.auth.url=https://oauth2.googleapis.com
google.login.url=https://accounts.google.com
google.redirect.uri=http://localhost:8080/google/login/redirect
google.client.id=위에서 생성한 클라이언트 ID 입력
google.secret=위에서 생성한 클라이언트 보안 비밀 입력
google.auth.scope=profile,email,openid
Property Utils
// @Value를 사용하기 위해 @Component 추가
// 해당 클래스를 Bean으로 생성해둠
// 추후 사용할 일이 있을 때, Bean 인스턴스를 꺼내 활용

@Component
public class ConfigUtils {
    @Value("${google.auth.url}")
    private String googleAuthUrl;

    @Value("${google.login.url}")
    private String googleLoginUrl;

    @Value("${google.redirect.uri}")
    private String googleRedirectUrl;

    @Value("${google.client.id}")
    private String googleClientId;

    @Value("${google.secret}")
    private String googleSecret;

    @Value("${google.auth.scope}")
    private String scopes;

	// Google 로그인 URL 생성 로직
    public String googleInitUrl() {
        Map<String, Object> params = new HashMap<>();
        params.put("client_id", getGoogleClientId());
        params.put("redirect_uri", getGoogleRedirectUri());
        params.put("response_type", "code");
        params.put("scope", getScopeUrl());

        String paramStr = params.entrySet().stream()
                .map(param -> param.getKey() + "=" + param.getValue())
                .collect(Collectors.joining("&"));

        return getGoogleLoginUrl()
                + "/o/oauth2/v2/auth"
                + "?"
                + paramStr;
    }

    public String getGoogleAuthUrl() {
        return googleAuthUrl;
    }

    public String getGoogleLoginUrl() {
        return googleLoginUrl;
    }

    public String getGoogleClientId() {
        return googleClientId;
    }

    public String getGoogleRedirectUri() {
        return googleRedirectUrl;
    }

    public String getGoogleSecret() {
        return googleSecret;
    }

	// scope의 값을 보내기 위해 띄어쓰기 값을 UTF-8로 변환하는 로직 포함
    public String getScopeUrl() {
//        return scopes.stream().collect(Collectors.joining(","))
//                .replaceAll(",", "%20");
        return scopes.replaceAll(",", "%20");
    }
}
DTO / VO
// 일회성 토큰을 받은 후, 해당 일회성 토큰을 가지고 AccessToken을 얻기 위한 Request VO
// lombok 사용

@Data
@Builder
public class GoogleLoginRequest {

    private String clientId;    // 애플리케이션의 클라이언트 ID
    private String redirectUri; // Google 로그인 후 redirect 위치
    private String clientSecret;    // 클라이언트 보안 비밀
    private String responseType;    // Google OAuth 2.0 엔드포인트가 인증 코드를 반환하는지 여부
    private String scope;   // OAuth 동의범위
    private String code;
    private String accessType;  // 사용자가 브라우저에 없을 때 애플리케이션이 액세스 토큰을 새로 고칠 수 있는지 여부
    private String grantType;
    private String state;
    private String includeGrantedScopes;    // 애플리케이션이 컨텍스트에서 추가 범위에 대한 액세스를 요청하기 위해 추가 권한 부여를 사용
    private String loginHint;   // 애플리케이션이 인증하려는 사용자를 알고 있는 경우 이 매개변수를 사용하여 Google 인증 서버에 힌트를 제공
    private String prompt;  // default: 처음으로 액세스를 요청할 때만 사용자에게 메시지가 표시
}
// 일회성 토큰을 통해 얻은 Response VO
// idToken을 전달해 사용자 정보를 얻을 예정
import lombok.Data;
import lombok.NoArgsConstructor;
@Data
@NoArgsConstructor
public class GoogleLoginResponse {
private String accessToken; // 애플리케이션이 Google API 요청을 승인하기 위해 보내는 토큰
private String expiresIn; // Access Token의 남은 수명
private String refreshToken; // 새 액세스 토큰을 얻는 데 사용할 수 있는 토큰
private String scope;
private String tokenType; // 반환된 토큰 유형(Bearer 고정)
private String idToken;
}// AccessToken을 활용해 JWT의 Payload 부분인 사용자 정보를 Response받는 VO
@Data
@NoArgsConstructor
public class GoogleLoginDto {
private String iss;
private String azp;
private String aud;
private String sub;
private String email;
private String emailVerified;
private String atHash;
private String name;
private String picture;
private String givenName;
private String familyName;
private String locale;
private String iat;
private String exp;
private String alg;
private String kid;
private String typ;
}
Controller(Service 구현 없이 하나의 Controller function 안에 로직 구현)
@Controller
@RequestMapping(value = "/google")
public class GoogleController {

    private final ConfigUtils configUtils;

    GoogleController(ConfigUtils configUtils) {
        this.configUtils = configUtils;
    }

    @GetMapping(value = "/login")
    public ResponseEntity<Object> moveGoogleInitUrl() {
        String authUrl = configUtils.googleInitUrl();
        URI redirectUri = null;
        try {
            redirectUri = new URI(authUrl);
            HttpHeaders httpHeaders = new HttpHeaders();
            httpHeaders.setLocation(redirectUri);
            return new ResponseEntity<>(httpHeaders, HttpStatus.SEE_OTHER);
        } catch (URISyntaxException e) {
            e.printStackTrace();
        }

        return ResponseEntity.badRequest().build();
    }

    @GetMapping(value = "/login/redirect")
    public ResponseEntity<GoogleLoginDto> redirectGoogleLogin(
            @RequestParam(value = "code") String authCode
    ) {
        // HTTP 통신을 위해 RestTemplate 활용
        RestTemplate restTemplate = new RestTemplate();
        GoogleLoginRequest requestParams = GoogleLoginRequest.builder()
                .clientId(configUtils.getGoogleClientId())
                .clientSecret(configUtils.getGoogleSecret())
                .code(authCode)
                .redirectUri(configUtils.getGoogleRedirectUri())
                .grantType("authorization_code")
                .build();

        try {
            // Http Header 설정
            HttpHeaders headers = new HttpHeaders();
            headers.setContentType(MediaType.APPLICATION_JSON);
            HttpEntity<GoogleLoginRequest> httpRequestEntity = new HttpEntity<>(requestParams, headers);
            ResponseEntity<String> apiResponseJson = restTemplate.postForEntity(configUtils.getGoogleAuthUrl() + "/token", httpRequestEntity, String.class);

            // ObjectMapper를 통해 String to Object로 변환
            ObjectMapper objectMapper = new ObjectMapper();
            objectMapper.setPropertyNamingStrategy(PropertyNamingStrategy.SNAKE_CASE);
            objectMapper.setSerializationInclusion(JsonInclude.Include.NON_NULL); // NULL이 아닌 값만 응답받기(NULL인 경우는 생략)
            GoogleLoginResponse googleLoginResponse = objectMapper.readValue(apiResponseJson.getBody(), new TypeReference<GoogleLoginResponse>() {});

            // 사용자의 정보는 JWT Token으로 저장되어 있고, Id_Token에 값을 저장한다.
            String jwtToken = googleLoginResponse.getIdToken();

            // JWT Token을 전달해 JWT 저장된 사용자 정보 확인
            String requestUrl = UriComponentsBuilder.fromHttpUrl(configUtils.getGoogleAuthUrl() + "/tokeninfo").queryParam("id_token", jwtToken).toUriString();

            String resultJson = restTemplate.getForObject(requestUrl, String.class);

            if(resultJson != null) {
                GoogleLoginDto userInfoDto = objectMapper.readValue(resultJson, new TypeReference<GoogleLoginDto>() {});

                return ResponseEntity.ok().body(userInfoDto);
            }
            else {
                throw new Exception("Google OAuth failed!");
            }
        }
        catch (Exception e) {
            e.printStackTrace();
        }

        return ResponseEntity.badRequest().body(null);
    }
}
궁금한 점 있으시면 언제든 댓글 문의 부탁드립니다.
감사합니다.


