
- Today
- Yesterday
- Total
메이쁘
[Swift] iOS의 Native 기능인 Dialog (AlertDialog, ActionSheetDialog) 를 구현해보자!! 본문
[Swift] iOS의 Native 기능인 Dialog (AlertDialog, ActionSheetDialog) 를 구현해보자!!
메이쁘 2020. 7. 11. 23:16안녕하세요.
Android 에도 존재하고, Web에도 존재하는 Dialog.
이제, iOS에도 존재하는 Dialog 를 구현해봅시다.
*** 버전 체크 하고 진행하세요!
- Swift : 5
- XCode : 11.5
- iOS : min 9.0
우선, 간단하게 Dialog에 대해 간단히 짚어보겠습니다.
Dialog 란?
- 간단하게 말하면, 사용자에게 필요한 정보를 알려주기 위한 팝업 창 입니다.
- 사용자에게 알림 / 경고 전달 뿐 아니라, 날짜 / 시간 선택, 목록 선택 등 사용자의 요구사항을 받기 위한 용도로도 쓰입니다.
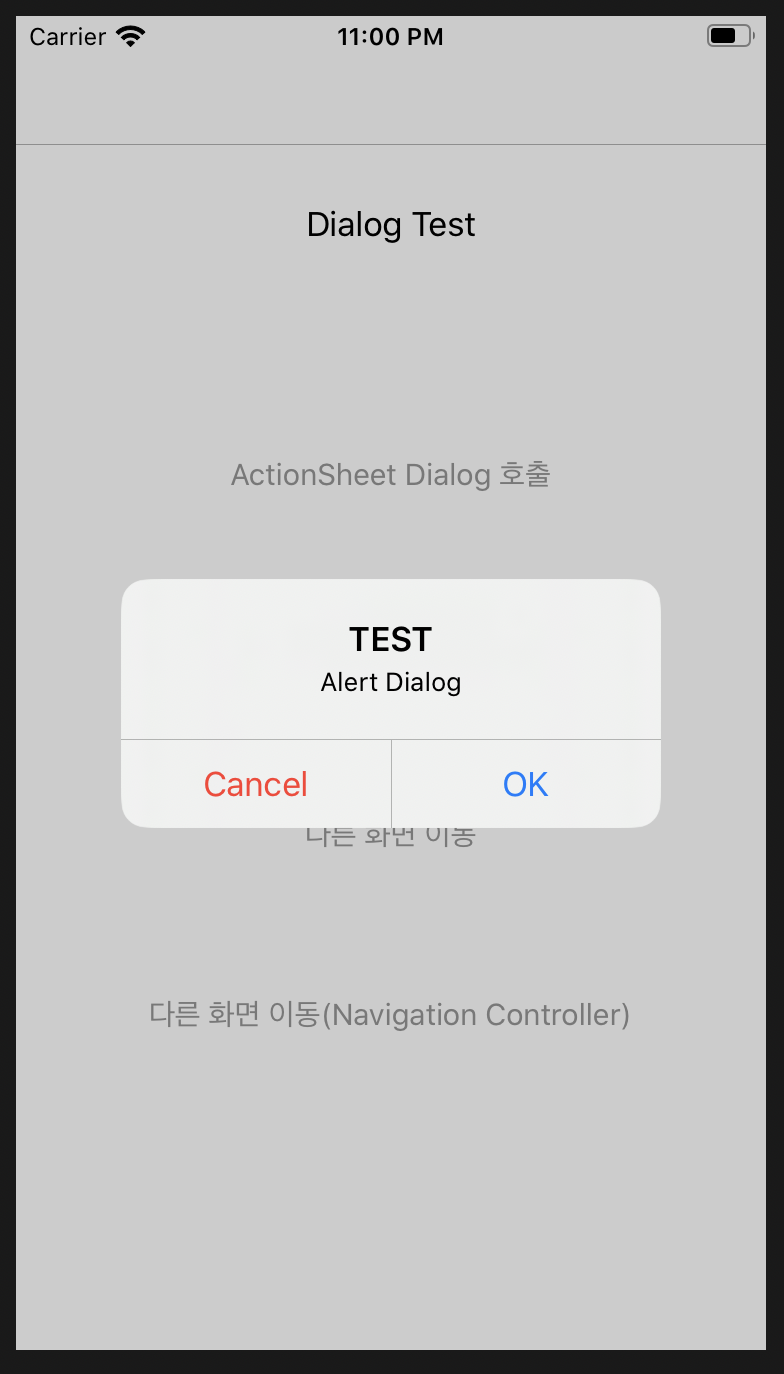

위 결과처럼 출력되는 것이 Dialog 라고 할 수 있습니다.
그럼 이제 코드를 작성하러 가볼까요 ~?
ViewController.swift
*** 굳이 ViewController 일 필요는 없음. Utils.swift 에 함수를 넣고 ViewController에서 사용해도 됨
저는 필요할 때 마다 함수를 호출하여 다이얼로그를 출력하는 방식으로 구현했습니다.
// Alert Dialog 생성
    func makeAlertDialog(title: String, message: String, _ isAlert : Bool = true) {

        // alert : 가운데에서 출력되는 Dialog. 취소/동의 같이 2개 이하를 선택할 경우 사용. 간단명료 해야함.
        let alert = isAlert ? UIAlertController(title: title, message: message, preferredStyle: .alert)
        // actionSheet : 밑에서 올라오는 Dialog. 3개 이상을 선택할 경우 사용
        : UIAlertController(title: title, message: message, preferredStyle: .actionSheet)

        // destructive : title 글씨가 빨갛게 변함
        // cancel : 글자 진하게
        // defaule : X
        let alertDeleteBtn = UIAlertAction(title: "Cancel", style: .destructive) { (action) in
            print("[SUCCESS] Dialog Cancel Button Click!")
        }
        let alertSuccessBtn = UIAlertAction(title: "OK", style: .default) { (action) in
            print("[SUCCESS] Dialog Success Button Click!")
        }

        // Dialog에 버튼 추가
        if(isAlert) {
            alert.addAction(alertDeleteBtn)
            alert.addAction(alertSuccessBtn)
        }
        else {
            alert.addAction(alertSuccessBtn)
            alert.addAction(alertDeleteBtn)
        }
//        print("alert button count : ", alert.actions.count)

        // 화면에 출력
        self.present(alert, animated: true, completion: nil)
    }
- parameter 중 isAlert 는 true 일 경우 Alert Dialog 를, false 일 경우는 Action Sheet Dialog 를 출력합니다.
- Alert 와 Action Sheet 를 구분하기 위해 UIAlertController 객체 생성 시 preferredStyle 의 값을 다르게 설정합니다.
-> Alert : .alert / Action Sheet : .actionSheet
- 중간에 버튼 객체를 생성하는 코드 또한 존재합니다. 이를 통해 Dialog 내에 버튼을 직접 커스텀할 수 있는데요.
주석을 보시면 아시겠지만, Alert Dialog 는 보통 버튼 2개 이하일 경우 사용하고, 버튼을 3개 이상 넣고싶으면 Action Sheet Dialog 를 사용하는 것을 권장하고 있습니다.
- Dialog 생성 순서 입니다.
1) 다이얼로그 객체인 UIAlertController 생성
2) 다이얼로그 내 버튼을 넣기 위해 UIAlertAction 생성
3) 다이얼로그에 버튼 객체 Add
4) 화면에 출력 (UIViewController.present)
이렇게 함수를 만들었으면, 원하는 부분에 함수를 호출하면 됩니다!
// Alert Dialog 호출 버튼 이벤트
    @IBAction func getAlertDialog(_ sender: Any) {
        print("[START] make Alert Dialog!")
        makeAlertDialog(title: "TEST", message: "Alert Dialog")
    }

    // ActionSheet Dialog 호출 버튼 이벤트
    @IBAction func getActionSheetDialog(_ sender: Any) {
        print("[START] make Action Sheet Dialog!")
        makeAlertDialog(title: "TEST", message: "Action Sheet Dialog", false)
    }
바로 이렇게 말이죠~!
*** @IBAction 은 무시하셔도 됩니다. 나중에 이것 관련해서 포스팅할게요!
안되는 부분이 있으면 바로 댓글 부탁드립니다.
감사합니다.
'Technology > iOS - Xcode' 카테고리의 다른 글
| [Swift] iOS의 Native 기능인 공유하기(Share) 를 구현해보자! (0) | 2020.07.12 |
|---|
